Spare Wheel Carrier
One of the things we considered when we were investigating tow vehicles is that our preferred tug, the Volkswagen Touareg, does not come with a full size spare wheel and tyre.
It is supplied with a space-saver spare that lives under the cargo area floor in a deflated state. A small compressor is supplied for inflating it when needed. We knew that if we bought one of these vehicles that we’d need to source a full size spare and find somewhere to store it. It is not possible (legal) to tow anything while driving on the space-saver.
The Search
As you all know by now (you have been following this blog, right?) we did indeed buy a Touareg, and so began the search for a full sized spare. Having considered after market wheels, including steel, we decided to stay with an OEM wheel. We could also use wheels from an Audi Q7 or Porsche Cayenne, as these are built on the same platform and use the same wheel specifications. Porsche seem to be the easiest to find, probably because more of their owners upgrade to after market wheels.
However, around the time our van was ready, we found some 2015 VW Touareg wheels on Gumtree. These are so similar to our 2011 wheels that close inspection is needed to tell the difference. The seller was a wheel and tyre shop, and was willing to sell us just the one wheel and tyre. We were willing to buy the set of four if necessary. The full set of wheels and tyres would have cost us less than one new wheel alone from VW, so a single wheel was a bargain!
The Van
Anyway, in preparation for this scenario, when we ordered our caravan we also ordered a second spare tyre carrier for the rear bar. This included upgrading to a 3-arm rear bar. The regular rear bar has only 2 arms connecting it to the caravan chassis. The third arm enables it to handle the extra weight of a second wheel and tyre.
We didn’t really think much about it after that. Our van arrived at the dealer… with two spares! We needed to clarify, but the extra wheel and tyre wasn’t ordered, they had simply assumed the carrier needed it. We even took delivery, sans second spare wheel, without a second thought… oops!
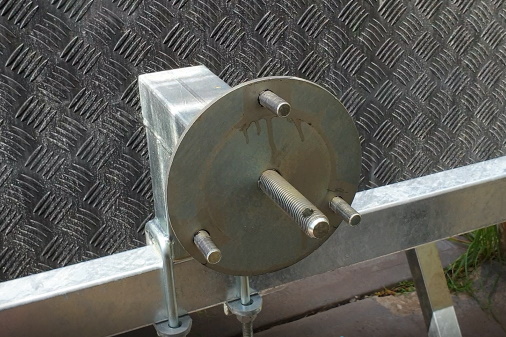
I had – incorrectly – assumed that since everyone knew the second carrier was for our car, that it would be some kind of universal fit. I know right? Never assume. Apparently the “everyone” who knew didn’t include the manufacturer. I didn’t even realise this problem existed until I lifted our newly found VW spare up to mount it. The supplied wheel carrier was welded up and so only fit the 6-stud pattern of our caravan wheels. Our VW has a 5-stud pattern and those studs are also set at a different diameter. There was no possible way to make them fit together. So there I was, 30 kg wheel and tyre lifted about a metre off the ground, and nothing to attach it to. D’oh!
The Plan
Queries via the dealer ended with the chassis manufacturer indicating they could only supply brackets to fit the wheels on the caravan. No joy there. A metal fabricator they pointed me to also couldn’t help. I eventually figured I should return the carrier as unfit for purpose and get a refund. We’d then hunt for a universal bracket. Failing that we’d find a fabricator that could make a new one up to suit the VW stud pattern.
But that changed during our weekend at the Cameron Caravans meetup at Tanunda. A couple of other owners suggested it would be simpler to modify the existing carrier to suit our wheel. So that then became the plan.
The plan changed again shortly after we got home, when I decided I’d try and modify the carrier myself. You can check out how that went in the video below.
The Execution
The initial concept was to simply remove two of the welded bolts from the carrier and support the wheel using the one remaining bolt. This was possible despite the difference in bolt pattern PCD because the centre hole in the VW wheel was large enough. Later though, I decided that relying on the single bolt wasn’t good enough. I scoured local stores and found nothing suitable, so online I went, and even there I had problems. What I needed were ½ inch diameter bolts with 20 threads per inch. This is a fine thread but was what matched the wheel nuts I already had. Finding high tensile bolts to match this specification proved difficult, but I eventually found some on Ebay, although they were 5-10 mm shorter than I’d have wanted at 2½ inches.
This time I removed the remaining welded in bolt and drilled three new holes to match the pattern of my wheel while taking care to place them as far as possible from the existing holes. I used the nuts that came with the bolts to hold them in place as I don’t weld. I didn’t want the (relatively) soft aluminium wheels pushing on the nuts, so I cut two old nylon cutting boards to go around the nuts and create a flat surface for the wheel to rest on. This didn’t leave much thread for the wheel nuts to attach to – hence why I wanted slightly longer bolts – but we’ve travelled over 4,000 km with this set up now and it has worked beautifully.
Tow Ball Weight
Once I had the wheel mount modified, I weighed the wheel and tyre – it came in at 27 kgs – and calculated it should reduce the tow ball mass by about 10 kgs. Checking this using my tow ball scales revealed an effect that almost exactly matched this figure (given the margin of error on the scales). I now feel our setup is too light on the tow ball at around 240 kgs, but we are also near the limits of the caravan’s ATM and our car’s rear axle load so it may have to suffice. The combination remains quite stable up to around 100 km/h, and so we sit at about 90 without trouble.


 Hallidays Point – Dec 2019 – Home
  Carpool Karaoke


